Planning Shifts (Calendar)
The page Time → Plan → Shifts is the portal's planning calendar: you see all planned shifts across properties in one calendar and can move, edit, or create them via drag & drop — including recurring series and Excel import.
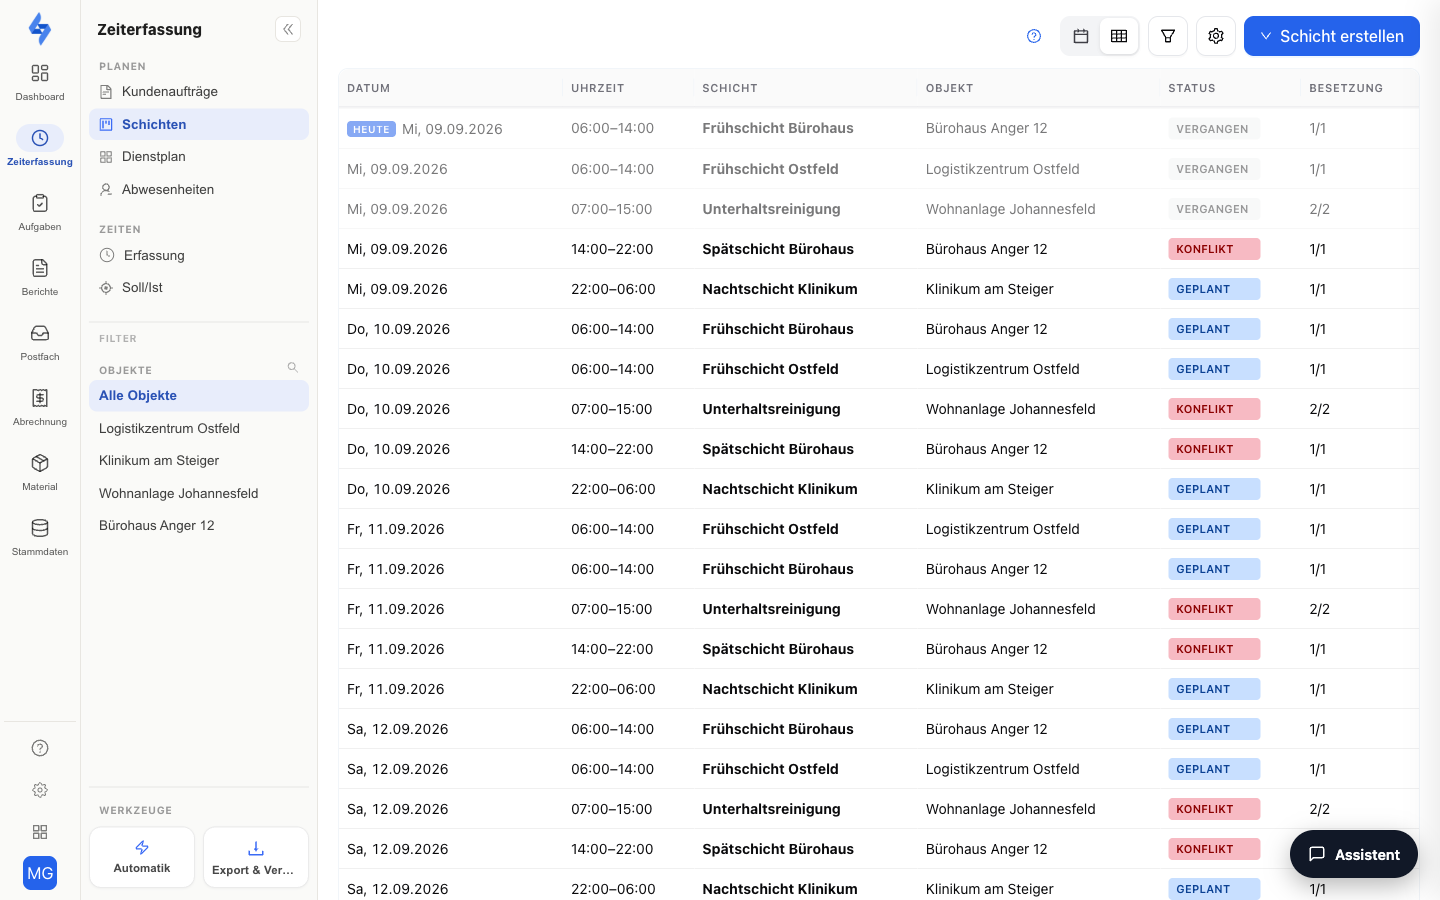
:::info The planning chain in the menu The Planning area in the sidebar bundles four items:
- Work orders — the frame: what is agreed with the customer. This menu item only appears with the LiteBill package; without it the area consists of the three remaining items.
- Shifts (this page) — the what and when: calendar with templates, series, and import.
- Duty roster — the who: the weekly staffing matrix.
- Absences — the exceptions to the plan.
All paths write to the same data — you can switch at any time. Alternatively, manage the shifts of one specific property under Property → "Time tracking" tab. :::
Features Overview
Creating Shifts & Import
Use the blue "Create shift" button to create a new shift — the dialog first asks whether you want to start without a template or choose a template. The dropdown menu of the same button additionally contains "Record absence", "Import" for the Excel/CSV import, and — in the week view — "Copy week to …" (see below). To the left of this button — if your plan limits the number of schedulable people — sits the quota chip "n of m"; details under Roster → Package note.
Template Sidebar (Right)
Lists all templates (recurring shift types) filtered by the selected properties. Each template shows:
- Label (e.g. "Day shift")
- Property assignment
- Start time
- Recurrence type (Daily / Weekly / Monthly)
Dragging a template from the sidebar onto a date creates a new shift instance from that template.
:::info Template, shift, assignment A template is the reusable shift type, a shift the (possibly recurring) series created from it, an assignment the individual occurrence. The menu item "Attendance → Preset" of earlier versions is gone — the evaluation of the generated shifts (the shift log) now lives under Time → Times → Target/Actual (see Shift Log). :::
:::info On Smartphone / Tablet The sidebar is hidden on small screens. Use the round + button at the bottom right instead. :::
Drag & Drop in the Calendar
- Move a shift — by dragging it to another date.
- Change duration — by grabbing the shift edges and dragging (when dragging: minimum 30 min., maximum 24 hrs.; in the dialog, durations from 1 minute are possible).
- Undo notice — after every move or resize, an undo option appears for 8 seconds.
Choosing the Scope
When moving, editing, or cancelling a recurring shift, a selection dialog appears (in the edit dialog: "This day only" / "From this day on"):
| Option | Effect |
|---|---|
| This event (or "This day only") | Creates an exception shift, marked in the calendar with a dashed border. The rest of the series remains unchanged. |
| This and all following events (or "From this day on") | Changes the series from the chosen date — all future shifts are regenerated. Already completed shifts remain unchanged. The dialog shows the number of affected dates. |
The series option is disabled when no future sibling shifts exist (last shift of the series or a single shift). Past, running, or already started shifts (with check-ins) open in a read-only view; moving into the past is blocked.
Calendar Views
| View | When available |
|---|---|
| Month | Default view on desktop and tablet |
| Week | Via the toolbar or a "more" click on a crowded day |
| Day list (smartphone) | Automatic on smartphones — grouped chronologically by day with a + button for creation |
Switcher Calendar / Table (Assignment List)
Next to the filter button sits a switcher with a table icon and a calendar icon: the table icon changes to the Operations table — every planned shift as a row with executors and "To do". The calendar itself no longer has its own menu item; you reach it via Time → Plan → Operations and this switcher. The former matrix view of this page is the dedicated menu item Time → Plan → Duty roster.
Copying a Week
In the week view (and in the assignment list), the dropdown menu of the create button offers "Copy week to …": staffing and individual assignments of the displayed week are transferred to one or more target weeks. You choose what happens to what is already planned (Update existing / Clear target week / Keep and add); a preview shows in advance how many assignments will be staffed, newly created, or cancelled. Assignments with check-ins and past dates remain untouched. Copy week is part of the shift planner automation and is included from the Standard plan — see Choose a plan.
Property Filter (Left Sidebar)
:::note Two sidebars The page has two side panels: on the left, the portal sidebar with the planning items and this property filter; on the right, the template sidebar. Only the filter on the left selects properties. :::
The property filter sits on the left in the Filter section. It is the only place in the portal where the property selection is multiple: you pick any number of properties you are authorized for, and the calendar shows their shifts side by side. Selected properties are stored in the URL — when you reopen the page, the same filter is active.
On narrow screens the left sidebar is not reachable; a compact property selector appears at the top instead.
Additionally:
- Show cancelled — checkbox in the filter; the selection is stored in the URL
- By default the first 10 properties are preselected
Conflict Detection
When creating or editing a shift, the system checks in real time whether the chosen time window collides with an already existing shift at the same property. On conflict, a warning appears with the exact times of the competing shift.
Planning Staffing
Besides the when and where, you also plan the who: the TARGET staffing of a shift. For week-based staffing planning with person rows, the duty roster is the right view — but the basics also apply here in the calendar:
Staffing in the Shift Dialog
In the shift dialog you assign the staffing via the "Assign employees" field (the label "employees" follows your hierarchy naming; in the read-only view the section is called "Planned staffing"). The assigned people appear in the calendar as chips (avatar + name) directly on the shift entry — so you see at a glance which shifts are staffed. Unstaffed shifts carry the "Unassigned" badge.
Filters: Staffing & "Only unassigned orders"
In the toolbar you filter the calendar by staffing (one or more people) or use the "Only unassigned orders" toggle to hide everything already staffed — the fastest way to find open gaps. Both filters are stored in the URL.
Conflict Warnings When Assigning
The dialog warns on saving in two cases:
- Absence — If a chosen person is reported absent in the shift period (approved absence), the hint "… is reported absent in the selected period" appears and the person carries the "absent" tag. In the calendar, a warning marks affected days: "An assigned person is absent on this day".
- Double assignment — If you create a shift for several properties at once and assign the same people, the dialog warns: "The selected people will be assigned to X properties at the same time. Stagger the times or continue anyway?" You can adjust the times or accept the conflict deliberately.
Sickness Cover: Restaff Only This Date
If someone drops out due to sickness, change the staffing of the affected date and choose "This day only" in the scope dialog — the replacement then applies only to this date (exception shift with dashed border), the rest of the series keeps its staffing.
Recording an Absence Directly
Via the dropdown menu of the "Create shift" button you reach "Record absence" — the same dialog as under Time → Plan → Absences. Next to it, a button with a counter shows the open absence reports and leads to the absence management. After an approved sick report with removed staffing, "Re-staff now" leads from there straight back here, with the "Only unassigned orders" filter active.
The planned staffing also appears outside planning: in the calendar overview (detail view of an event) and in the coverage as the day's "Staffing" column.
Creating Notification Channels Inline
In the shift dialog you choose the notification channels (push, SMS, phone, email). Phone number, email recipients, or message template can be created directly from the dialog — no need to switch to the Automation area. The new entries are then available account-wide.
Advanced Settings: Auto Check-out & Live Check
Under "Advanced settings" in the shift dialog you can additionally activate:
- Auto check-out — If no check-out is recorded, the system automatically checks employees out X minutes after the shift ends (see automatic check-out).
- Live check (lone working) — Employees must actively report back at a set interval (with a grace period). If the report fails to arrive, the alerting rules kick in.
Visual Markers
| Look | Meaning |
|---|---|
| Solid border | Regular shift from the series |
| Dashed border | Exception shift — created individually, deviating from the series pattern |
| Gray, 40% opacity | Cancelled shift (visible with the toggle active) |
| Grayscale + 50% opacity | Past shift (clickable for read-only view) |
| Red background + red left border | Public holiday |
| Light blue background | Today |
The Duty Roster (Staffing Matrix)
The weekly staffing matrix — person or property rows, weekly hours, absence bands, multi-select, the "Without assignee" row, and auto-assign respecting absences, working time law, qualifications, and contract hours — is its own page: Time → Plan → Duty roster. That is where you plan the who; this calendar page remains the home of the what and when.
Typical Flows
Moving a Shift from Monday to Tuesday
- Click the shift in the calendar and drag it to the target date
- For a recurring shift: choose "This shift only"
- Wrong choice? Click "Undo" in the undo notice within 8 seconds
Scheduling a Template from the Sidebar
- Open the right sidebar (if collapsed)
- Drag the template onto the desired date
- Check times / requirements in the dialog that opens → Save
Checking a Conflict
- Create or move a shift
- On a time overlap, a warning appears with the competing shifts
- Adjust the time or accept the conflict (e.g. with several employees in parallel)
Permissions
| Action | Permission |
|---|---|
| Open planning | View time tracking |
| Create / move shifts | Create time tracking |
| Edit shifts | Edit time tracking |