Workflow Editor
The workflow editor opens as its own full page whenever you create or edit a rule under Tools → Automation → Rules. You assemble the rule graphically: cards for triggers, conditions, and actions are placed on the canvas and connected — from "When this happens" to "Then do this". The editor does not prescribe a fixed flow: which building blocks you combine into a rule depends on the procedures in your company.
Features Overview
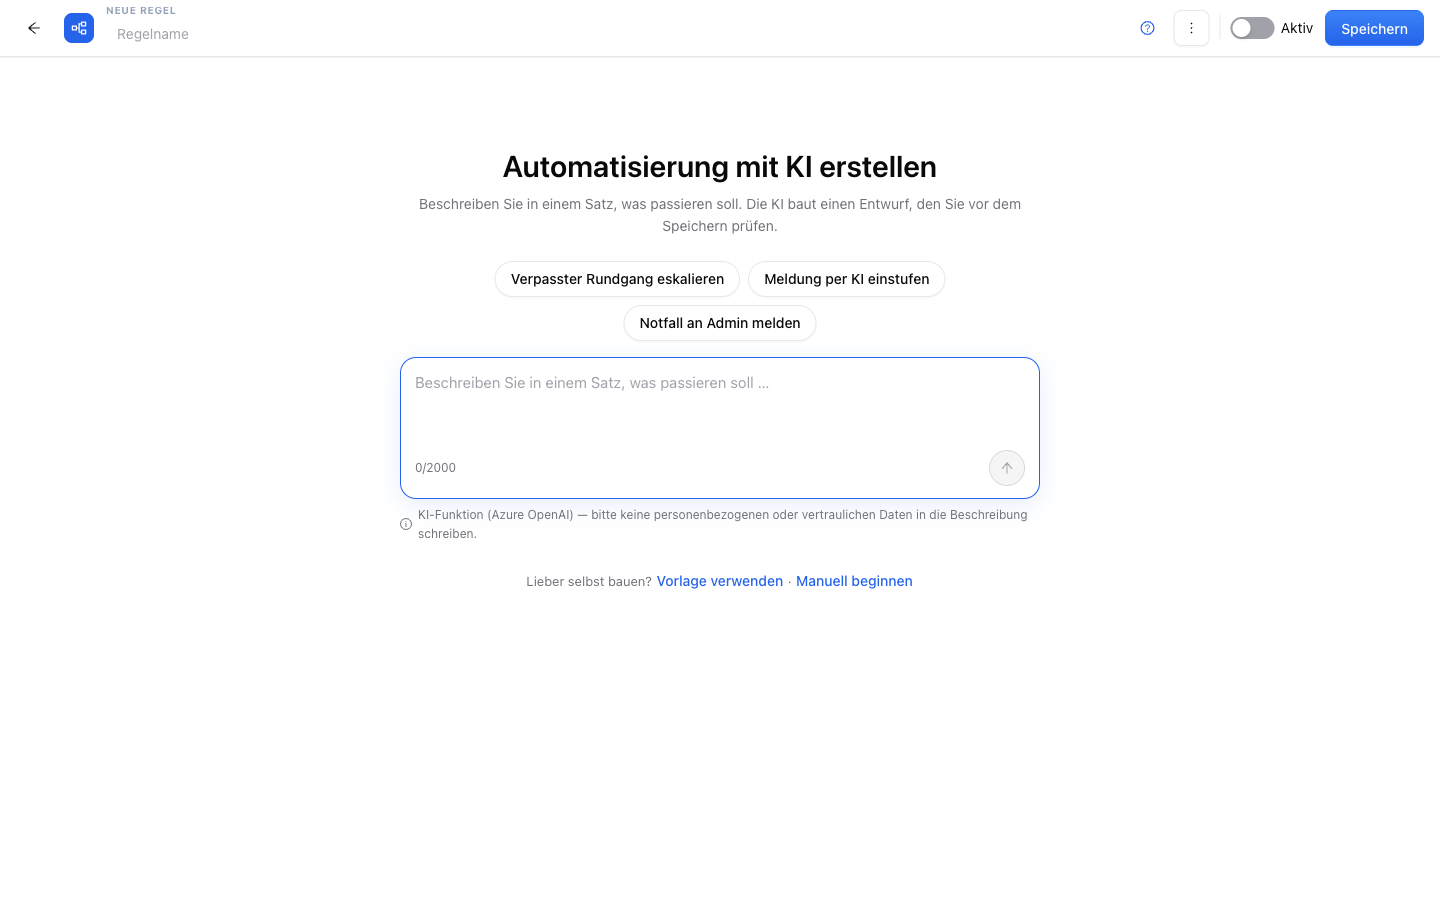
Choosing a Starting Point
When creating a new rule, you choose how to begin:
| Start | Description |
|---|---|
| Blank | You build the rule from scratch yourself |
| Description | You describe in your own words what should happen — the AI creates a draft rule |
| Template | You start with a ready-made rule template ("Use template") and adapt it. The selection shows each template's chain as a preview, its area (e.g. incident, safety), and badges for package or SMS requirements |
The template gallery on the (still empty) Rules page also leads here: if you choose "Set up" there, the editor opens with the fully assembled chain as a draft. In an editor that already has cards, you reach the templates at any time via "Use template".
Trigger
Every rule starts with exactly one trigger — the event it reacts to (e.g. "Patrol missed" or "Incident created"). The trigger determines which condition fields and placeholders are available in the rule. You can find the full trigger list on the Rules page. Rules on the umbrella triggers (marked "umbrella trigger") are also built here — but they are assigned not via an event, but through the reaction defaults.
Conditions
Condition cards narrow down when the rule actually runs. You choose the field from a list matching the trigger — for the "Patrol missed" trigger, for example, the patrol name; for incidents, for example, category or severity; for forms, for example, the score or "defect present"; for material requests, for example, status or requester. You combine multiple conditions with and/or, including nested groups; every condition has a true and a false output, so you can continue both branches differently.
The available comparison operators are equals, not equal, greater than, less than, contains, is empty, and is not empty — "greater/less than" only for number fields, "contains" only for text fields. Two fields with special meaning:
- Change type (on the "Shift assigned/changed" trigger) — says whether the assignment was added (
added), removed (removed), or changed (changed). - Escalation stage (on the proof-of-life triggers) — carries the stage of the alarm chain the rule reacts to.
The field list is deliberately limited to the most useful fields. Via "Custom field…" you can instead enter any raw path from the event directly — all operators are then available.
AI Classification
For incident triggers you can insert an "AI classification" card: the AI rates the incident by urgency and category, and subsequent conditions can react to this rating — for example, "escalate only on high urgency". The card writes the rating into the rule run; in the following condition card, pick one of the fields AI urgency (low, medium, high, critical), AI category or AI confidence.
:::caution The card needs the AI feature switched on If AI classification is not enabled under Settings → Features → AI features (default: off), or the monthly budget is used up, the card returns no result — every following condition on "AI: …" is then false and the chain goes nowhere. The test run, by contrast, uses sample values and therefore still looks green. :::
Alternatively, work without that card and use the trigger "Incident classified": it only fires once the classification already exists.
Actions
What should happen when trigger and conditions match:
- Notification — to selected recipients via the channels email, push, and in-app as well as — with the bookable SMS feature — SMS and call, with a selectable template
- Create task — automatically creates a task in the "Tasks & Routes" workspace, e.g. from an incident, a form defect or a missed patrol. On the card you set Title (optional), Priority and Assignee. Where the task gets its data from depends on the trigger: on Incident created/classified and the form triggers it is created at the property of the incident or response, stays linked to it and takes over text, photos and severity. On every other trigger that carries a property — such as "Patrol missed", "Checkpoint missed", "Check-in missing" or "Material below minimum stock" — it is created at the property of the event; the default title is then trigger plus name (e.g. "Patrol missed: Night round hall 3") and the priority is "Medium". In both cases the task receives neither a due date nor a checkpoint link, and exactly one task is created per event. On task triggers (task due/overdue/…) the action is not possible — a task must not spawn a follow-up task; the editor warns. Triggers without a property (e.g. sick note) are skipped; the History shows this as "Skipped: no object in the event"
- Assign task / change task phase — automatically edits the affected task on task triggers. When assigning, besides a fixed person you can also choose the mode "Today's shift staffing" — the task then goes to the person(s) planned as staffing for that day. For days without staffing you can set a fallback person (optional). If there is none either, the task stays unassigned and the history shows "Skipped: no shift staffing"
:::info Tasks go to a person, not to a role In the Assignee field you search for a specific person. A role such as "caretaker" cannot be stored here — the role picker exists only on the notification actions as a recipient strategy. Leave the field empty and the task is created unassigned in the status "Open". :::
- Open incident — automatically creates an incident, e.g. on a failed attendance requirement. Via "Checkpoint (optional)" you attach the incident to one of the property's checkpoints — the field becomes available once the trigger is scoped to a specific property
Batched sending (digest)
On the actions email, push, and in-app notification you can switch to a digest instead of one message per event. The rule then collects all events and sends them bundled as a single message:
| Mode | Meaning |
|---|---|
| Time window | The first event opens a window (1–168 hours); everything arriving within it lands in the same message |
| Daily at … | All events of the day are sent together at a fixed time |
Two fields on the card determine the text of the digest: the line template (one line per event, with the trigger's placeholders) and the envelope (subject/body with the placeholders {Liste}, {Anzahl}, and {Zeitraum}). Push messages show at most three lines and summarize the rest as "+N more".
"On failure" output
Every action card has two outputs: "Continue on success" (bottom) and a red "On failure" output. Connect the failure output to another card and the rule continues there when the action reached nobody — for example because no recipients were determined, the email could not be delivered, or a call went unanswered. This lets you build fallback paths: "Email the management — if that fails, call the on-call service."
Without a connected failure output nothing changes about the existing behaviour: the execution is retried automatically several times (see History).
Escalation
For multi-level alarm chains there are three building blocks you can combine freely:
- Offer assignment — first offers the takeover to a group; the first acceptance wins. You set the claim window (minutes) on the card (default: 5); after it expires, the offer counts as expired
- Delay — waits a configurable time before continuing
- State probe — checks the current state after the wait (e.g. "has the incident been handled in the meantime?"), so the next level only fires if nobody has reacted yet
The state probe writes three live fields into the rule run, which you query in the following condition card:
| Field | Meaning |
|---|---|
| Resolved | The triggering event has been handled in the meantime (e.g. incident resolved, tasks completed) |
| Acknowledged | Someone has acknowledged the event (see below) |
| Call confirmed (key 1) | After the "Trigger call" action, someone confirmed the call by pressing key 1 |
After the first notification, the escalation is a chain of four cards: delay → state probe → condition (only continue if nobody acknowledged) → action (notify management). You find it fully assembled in the template gallery, e.g. as "Incident → AI triage → escalation". Escalation is thus always something you set up and switch on once — it does not happen out of the box.
Acknowledgement: "Acknowledgement required"
The actions Send push and In-app notification offer the option "Acknowledgement required". With the checkbox set, the entry stays under "To acknowledge" in the recipients' inbox until the person acknowledges it. For incidents, rounds, and attendance this also acknowledges the triggering event — and stops the escalation chain: the state probe then sees "Acknowledged", and the next level no longer fires. Without the checkbox the notification is silent and counts as read once opened.
Attach form PDF
The Send email action offers the switch "Attach form PDF". When set, the rule attaches the submitted report as a PDF to the email — the same PDF the "Send" button on the form response produces; the action's subject and text become the subject and cover message of the mail. After cleaning a holiday apartment, for example, the ticked-off checklist automatically reaches the landlord as a receipt. The switch only takes effect on the form triggers (form submitted, defect detected, score below threshold, field signal, review requested/approved/ignored) — on any other trigger the email goes out without an attachment, and the editor warns when saving. Digest and acknowledgement cannot be combined with the attachment: a digest is not applied to this mail, and a set acknowledgement button wins while the attachment stays off (the history shows this). The send counts against the plan's monthly dispatch quota just like a manual send; once it is exhausted the action is skipped and recorded as such in the history. Archived or superseded reports are not sent.
Validation Before Saving
The editor continuously checks the rule for completeness — for example, missing connections, empty recipients, or unreachable cards. Errors and hints appear directly on the affected cards and in the validation panel; the rule cannot be saved while errors remain open.
Test Run
Before saving, you simulate the rule with sample data: the test run shows which cards would be traversed, which recipients are determined, and what the notification would look like — without anything being sent. For actions with batched sending, the test run additionally shows the digest configuration (window or daily time). You can adjust the sample data in the test dialog.
Working on the canvas: undo, tidy up, copy
- Undo/Redo — every step (card, connection, moving, deleting, even overwriting via a template) can be taken back with Ctrl+Z and repeated with Ctrl+Shift+Z; the same buttons live in the header bar.
- Tidy up — automatically arranges all cards in a clean tree layout (yes-branch on the left). This too can be undone with Ctrl+Z.
- Copy & duplicate — select one or more cards (multi-select with Shift, selection box with Shift+drag) and copy them with Ctrl+C/V or duplicate them directly with Ctrl+D or the "Duplicate" button. Connections within the selection are preserved — so you multiply entire escalation levels instead of reconfiguring each card. The trigger card is never copied, because every rule has exactly one trigger.
Exporting and importing a rule as a file
Via the buttons in the header bar you export the rule as a JSON file (litelog-workflow-….json) and import it elsewhere — for example to send a rule to support or to reuse a proven template in another account. The import replaces the current layout after confirmation (Ctrl+Z brings it back). If the imported rule references things that do not exist in the target account (e.g. a specific property or template), the validation marks the affected fields in red — you correct them before saving.
Versions
Every save that changes the layout or the name automatically creates a version of the rule (the last 20 are kept). Via the "Versions" button you see the history with date, author, and card count, and you can restore any earlier state — restoring itself creates a new version, so nothing is lost.
Running executions (e.g. a waiting escalation chain) stay on the state they started with — a rule change only affects new events.
Scope & Name
You assign the rule's name in the header area; if you save without a name, the rule automatically receives one ("Automation N"). You set the scope on the trigger card — "Applies to": All, a specific property, or a specific customer.
Good to Know
:::tip Note
- Editing an existing rule opens the same editor with the rule loaded.
- A rule limited to a property only reacts to events of that property.
- The test run has no side effects — no real notifications are sent and no tasks are created.
- The AI draft created from a description is always saved disabled — review it and enable the rule deliberately. Do not paste personal data into the description.
- The actions beyond notifications (create/assign task, change task phase, open incident) and the escalation building blocks delay and state probe are available in the larger packages; SMS and call require the bookable SMS feature. Locked cards are marked accordingly in the editor. :::
Permissions
:::info Permission To create or edit rules, you need the Create workflows or Edit workflows permission. Contact your administrator if you do not have access. :::