Force overview (live status board)
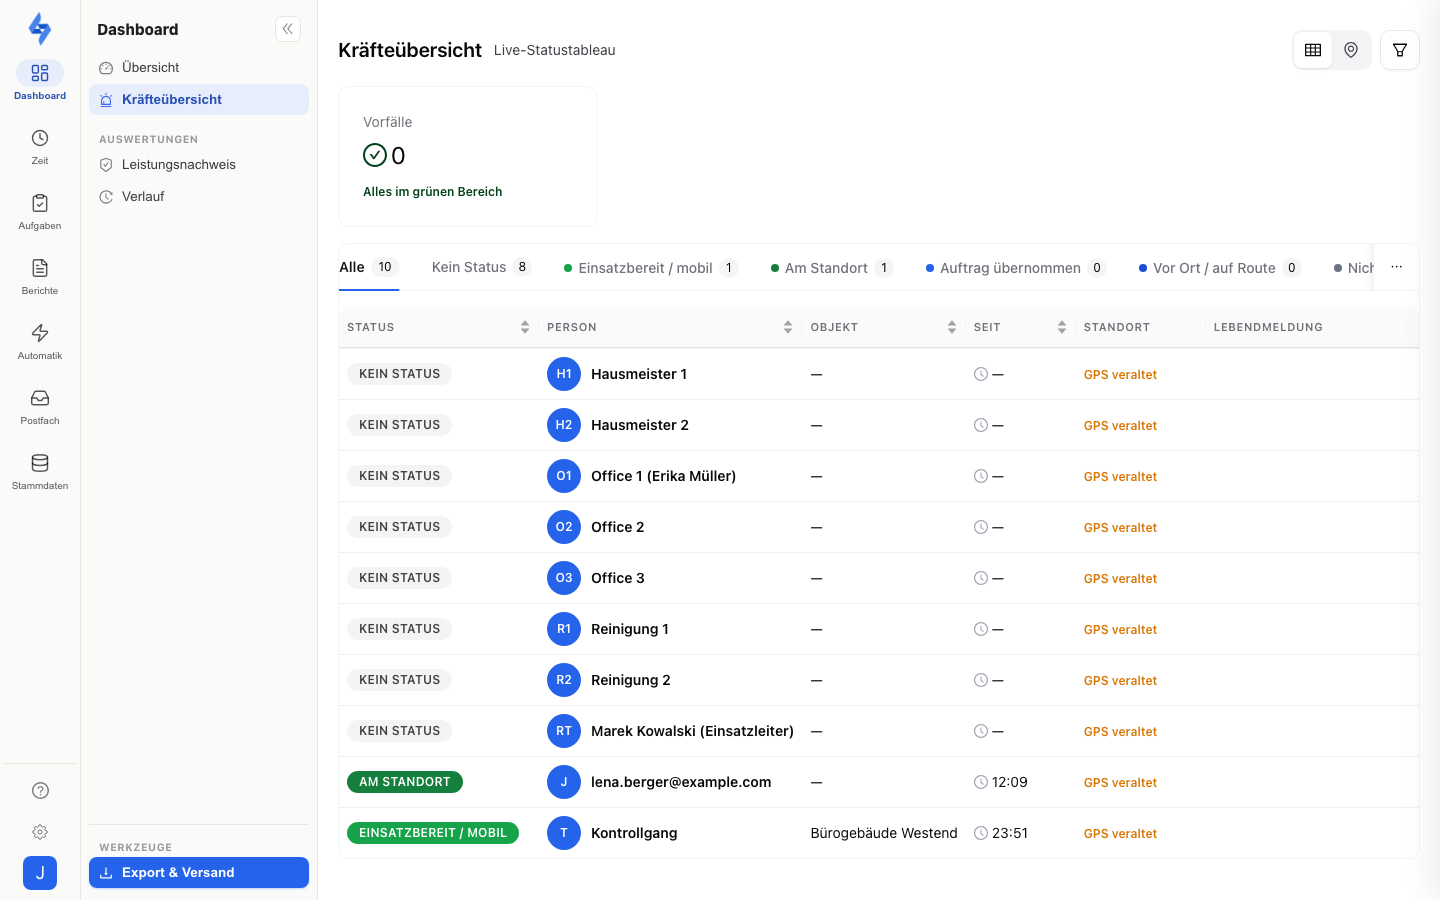
The Force overview (menu item Dashboard → Now → Force overview) is the control room's live status board: you see in real time which personnel status each person currently reports, at which object they are, whether their GPS position is fresh, and whether a proof-of-life check-in is overdue. The data refreshes automatically — no manual reload is needed.
The menu item only appears when the Force overview feature is unlocked for your account and you hold the View force overview permission.
:::info Plan The force overview is part of the Lone worker protection add-on (€29 per month — together with the proof-of-life check-in including escalation and a quota of 100 SMS per month). It is included in the Premium plan; with the other plans you book it as an add-on. See Choose a plan. Accounts created before the changeover keep their previous scope. :::
What is this view for?
The force overview answers the control room's question: Are all staff safe and ready — and where do I need to intervene right now? Critical events (SOS emergency, proof-of-life main alarm) are collected in the incident card and can be acknowledged there; the board below shows the complete status snapshot of all staff.
Incident card
At the top of the page sits the Incidents card. It counts only the two critical event types:
- Emergency — a person triggered the SOS button of the status reporter or was set to emergency automatically.
- Main alarm — a person's proof-of-life check-in stayed out even after the grace period.
Without incidents the card shows a green "All clear". With incidents it turns red, shows the count per type, and a click (or Show) opens a list of all incidents with person or object and the incident's age. With the Configure force overview permission you can acknowledge each incident — the confirmation dialog ("Acknowledge proof-of-life" or "Acknowledge emergency") lets you optionally record a reason or note, e.g. "reached the person by phone".
The card never grows with the number of incidents — even a mass event stays a compact figure, with the details in the expandable list.
Status tabs
Above the board sits a tab bar with a counter per tab:
- All — all staff.
- No status — staff who have not reported a status yet.
- One tab per status definition — e.g. "Ready", "Break", each with the status's colour dot.
The tabs therefore match exactly the statuses you created under Settings → Status definitions; there, each status is additionally assigned a semantic category (Available, Engaged, Unavailable, or Emergency) — see Status definitions.
Filters
The filter button at the top right reveals the filter row: you can narrow to one object and/or one person. Both filters live in the URL and are therefore preserved in shared links and when navigating back; the tab counters always refer to the filtered set.
The board (table)
Each row is one person; clicking the row opens the person's status side panel. The columns:
| Column | Content |
|---|---|
| Status | Coloured status pill; with Configure force overview it doubles as an inline quick-set menu right in the row |
| Person | Name with profile picture |
| Object | Object where the person is currently reported |
| Since | Time of the last status change |
| Location | GPS indicator; if the last position report is too old, the hint GPS stale appears |
| Proof of life | State of the proof-of-life check-in (see below) |
The Status, Person, Object, and Since columns are sortable; the sort order also lives in the URL.
Proof-of-life column
For staff with the proof-of-life check-in enabled, the column shows the current state:
- Active — with the hint "Next check-in due at HH:MM".
- Pre-alarm — the check-in is overdue; please make contact.
- Main alarm — no check-in despite the grace period; act immediately. With Configure force overview, an Acknowledge button sits right on the row.
How check-in monitoring works overall (interval, pre-alarm, main alarm, escalation via automation) is described in Check-in Monitoring (Dead Man's Switch); the per-object configuration — including the status reporter with SOS button in the app — is covered in Proof of Life & Status (Property).
The person's status side panel
Clicking a row opens the person's side panel with two areas:
- Set status (only with Configure force overview) — the complete status catalogue as coloured tiles; you pick the new status and confirm with Set status. The deliberate two-step interaction (pick → confirm) prevents a misclick from, for example, firing the emergency chain.
- Status history — the person's history as a timeline: each entry with status, time, object, and originator (Set by self, By the control room, or Automatic), paginated.
Map view
If the Live map feature is additionally unlocked and you hold View live map, a Table/Map toggle appears at the top right. The map shows the currently filtered staff as markers plus the checkpoints and areas of the involved objects. Without the live map, the table remains fully usable.
Good to know
:::tip Note
- As long as no person has reported a status, the board is empty: "No status reports yet." First define your statuses under Status definitions and activate the status reporter on the desired objects.
- Status reports from staff come from the LiteLog app (dashboard tile Status reporter); the control room can additionally set statuses here in the portal. :::
Permissions
:::info Permission This page requires the Force overview feature and the View force overview permission. Contact your administrator if you do not have access. :::
| Action | Requirement |
|---|---|
| Open the page | Force overview feature + View force overview permission |
| Set statuses, acknowledge incidents/alarms | Configure force overview |
| Map view | Live map feature + View live map permission |